RetroScan Universal Instructions
Click HERE to return to the MovieStuff support page.
Trouble shooting tips can be found HERE.
For SLIDE GATE INSTRUCTIONS click HERE.
Unpacking the unit:
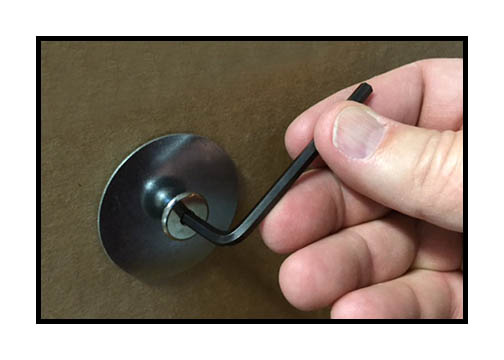
Using the provided hex wrench, remove the screw holding the unit to the inner box.
Replace the screw as shown.
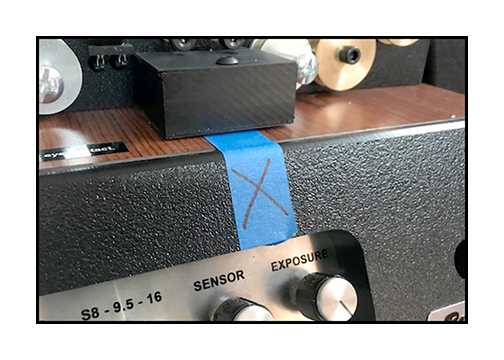
Remove the gate from the unit and then peel off the blue tape.
Make sure the round diffuser stays in place.
After unpacking the unit, locate the following accessories.

Depending on whether you purchased the HD or 2K version of the Universal, you will find either a standard USB or a USB3 cable, respectively. Either cable can be replaced with a higher quality cable if desired. However, do not extend or use a cable longer than about 6 feet or 2 meters. The power supply has a removable power cord that can be replaced with the type typical for your wall receptacle. The spacers are used for reel alignment and the provided hex wrench is used to tighten or adjust any components that might have shifted or come loose during shipping. The wing nut is used on the take up reel. This is a standard American 5/16 thread, easily found in any hardware store, in case it gets lost.
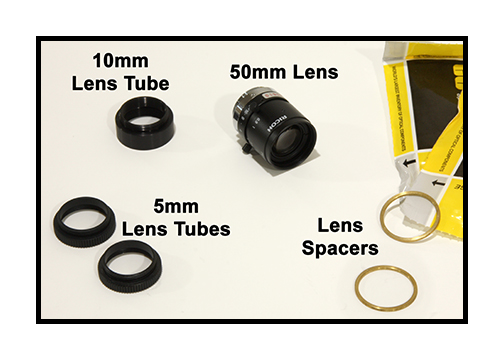
Depending on which gate you purchased, you will need to also locate the lens and lens tube(s). If you purchased the 16mm gate, you would find one 10mm tube and only one 5mm lens tube. If you purchased the 9.5mm gate, you would a 10mm tube and two 5mm lens tubes. Please note that the thin brass lens spacers shown in the above picture are inside the yellow Edmund plastic pouches. Some people mistakenly throw those away thinking they are lens tissue. They are not. The brass lens spacers are contained inside the yellow pouches.
IMPORTANT NOTE ABOUT 2K OPERATION
If you purchased the 2K version of the Universal, you have been provided with all the tubes and rings necessary for capturing all non-cropped film formats up to and including 2048 x 1152, 16:9 with pillar bars. If you are going to attempt full width sensor (2048 x 1536) 2K captures, then you may require additional tubes and rings, depending on the format being captured. We do not supply these with the 2K version of the unit for several reasons. One is that there is no way to predict exactly what tubes and rings users will need as the combinations are format dependent. Second is that most users are not capturing full sensor 2K so including every possible combination of extra tubes and rings would only make the 2K version of the unit needlessly more expensive for everyone. If you find that you need to order more rings and tubes, you can get them directly from our supplier. Information required can be found by clicking HERE.
If you purchased the dual 8 gate, then you would find a single, adjustable lens tube.
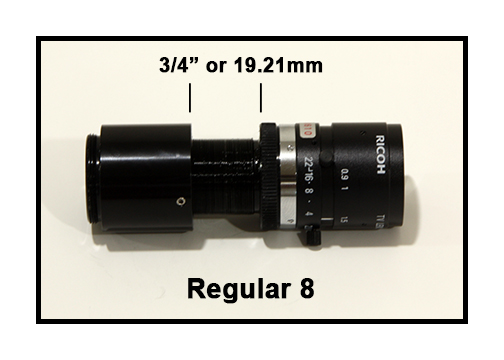
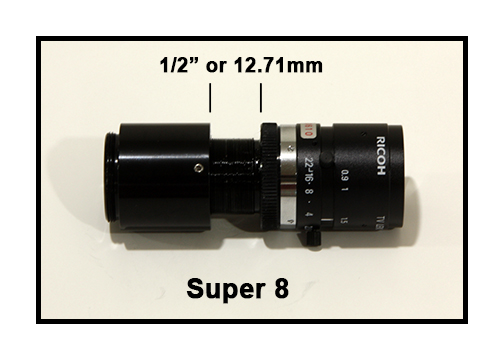
The length of the tube controls the degree of crop.
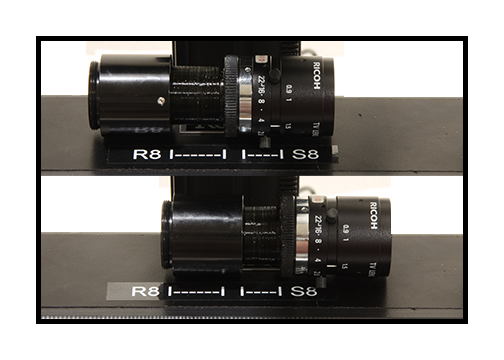
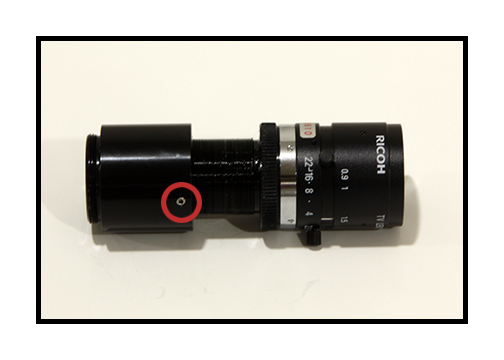
On the top of the dual 8 gate, you will find a handy gauge to set the proper length. This is just a general guide. You can set the tube to any length desired. Use of the 2K camera will require an increase in the length of these tube positions. Experimentation will be required to determine the correct tube length. Also, there is a small set screw to lock the tube into permanent position. Do not over-tighten! You can purchase additional tubes, rings and lens components directly from our supplier. Please see this page HERE.
This
adjustable lens tube will not work with 9.5mm
or 16mm film.
When working with 16mm or 9.5mm film, remove this adjustable lens tube
before proceeding with the next section.
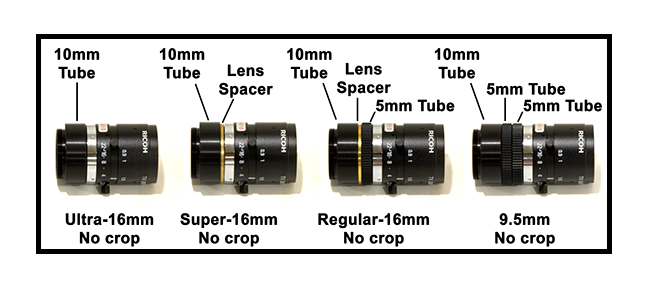
For 16mm and 9.5mm, you will need to adjust the
degree of cropping by changingWhen working with 16mm or 9.5mm film, remove this adjustable lens tube
before proceeding with the next section.
the length of the lens tube using the provided rings as shown above. These combinations
will allow you to see the frame lines of the film being captured.
Adding this spacer will make the lens tube just long enough to crop inside the frame lines.
These brass lens spacers are inside the yellow Edmund plastic pouches.
NOTE: You can use more than one spacer but not at the same joint. Ideally, insert
additional spacers between other lens tubes in the chain or at the camera end.
Turning the focus barrel of the lens will allow additional
fine adjustments in desired cropping for any format.
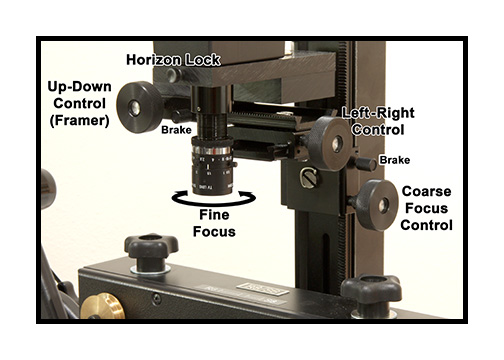
The camera compound can move the image up and down as well as left and right by turning the appropriate knobs. Each function has a brake that can be slightly tightened to provide resistance or the brake can be tightened to lock the camera into position. The image can also be rotated for horizon correction by unlocking the horizon lock and simply turning the camera by hand.
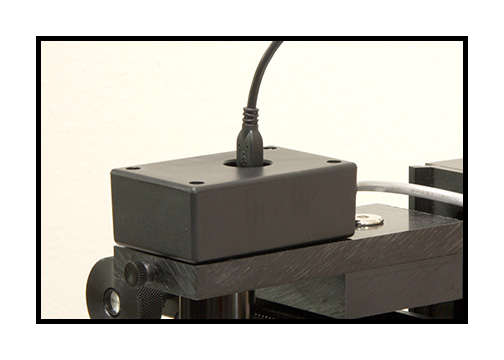
The included USB cable plugs into the opening on the top of the camera box. The 2K camera has a slot in the back of the camera box. The trigger cable plugs into the same port for both cameras.
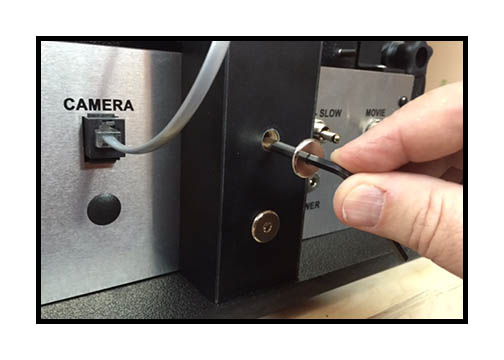
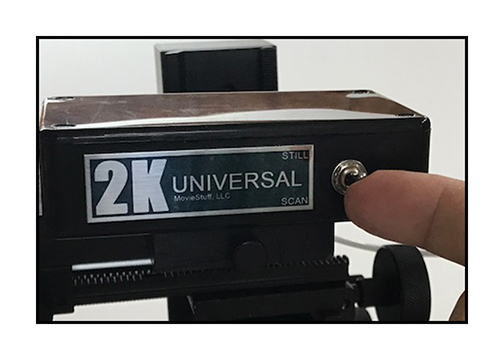
If working with the 2K camera, you will need to plug in the camera remote cable in the back of the control box as shown. The STILL switch position prevents the motor from running when you put the Universal in the "forward" mode. This will let you hold the film tight and focus on a still frame using the "live" mode of the new 4.0.1 software. The SCAN switch position returns the Universal to normal run mode. Be sure to take the software out of "live" mode before trying to scan film.
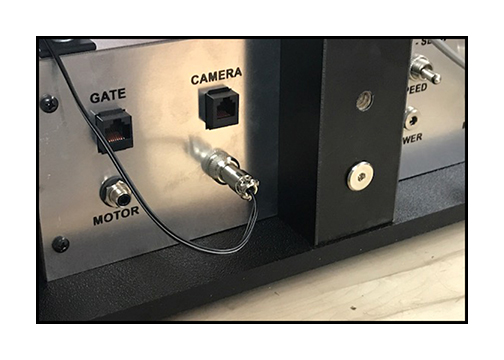
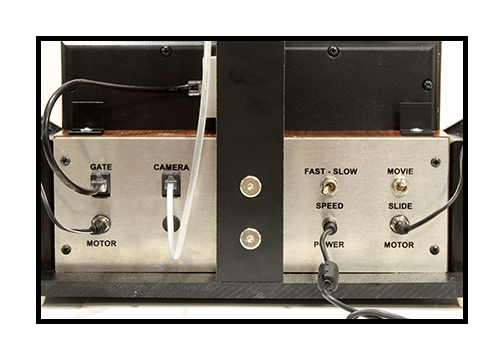
Motor cables may be unplugged. If so, locate the ends of the motor cables and plug into
designated jacks found on each side of the back panel as shown above.
The rear panel has a few presets for operation. Fast mode is about 15fps and slow is about 10fps. It is advisable to use the slow mode when capturing uncompressed. In the movie mode, the film will run through the unit like normal. In the slide mode, the light comes on but the film does not move. This mode is for use with our optional slide gate. Please note the location of the various cables such as power, gate, camera and motor connections.
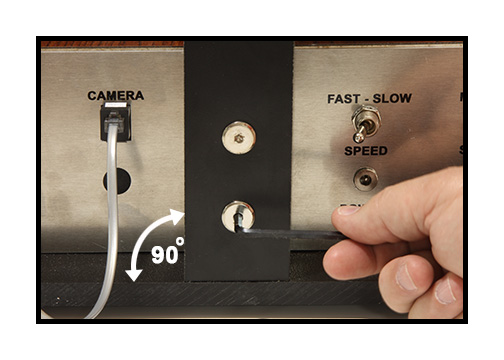
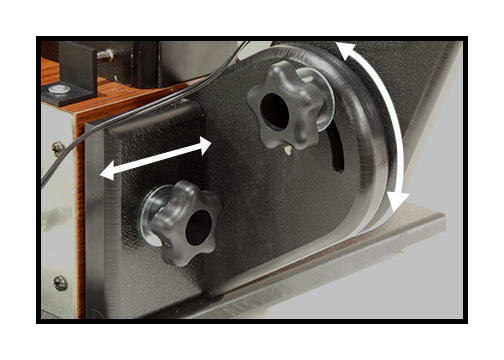
NOTE: After unpacking the unit, you may need to straighten the column if it shifted during shipping. To adjust the column, use the provided hex wrench to loosen the two bolts, adjust the column as shown to 90 degrees and then tighten down the two bolts firmly.
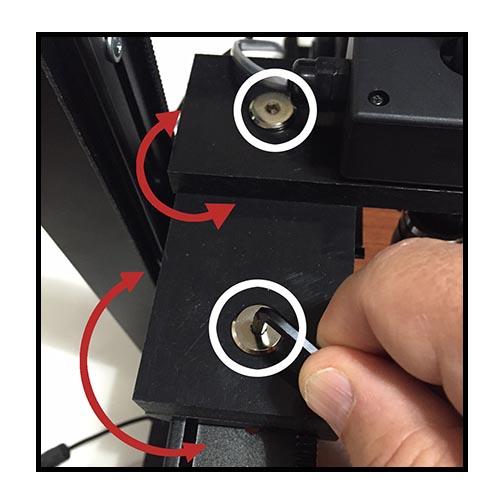
Also, if during capture of your movies,,you find that the camera is no longer aligned with the gate and adjusting the camera compound will not let you center the image left to right to get rid of the sprocket hole edge or the opposite edge, then the camera plates or gate may have become out of adjustment during shipping and need to be reset. First make sure that the gate is seated correctly by loosening the black knobs on top and pushing the gate back completely until the silver studs on the back of the gate make solid contact with the black alignment brackets at the back of the unit (see first picture). Also make sure that the film is oriented properly with the sprocket holes on the inside edge. If that does not correct the alignment issue, then use the provided hex wrench to loosen the silver studs on the two camera plates and rotate them as needed until the camera is aligned properly over the gate. Make sure that you firmly re-tighten the studs after adjustment. Once this adjustment is made, you will never have to address this issue again.
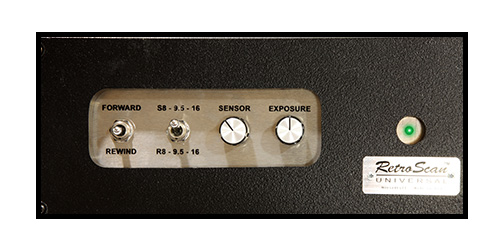
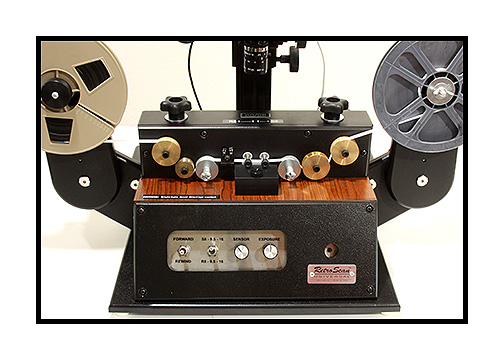
The front panel has controls for forward and rewind with center off.
The green LED blinks to indicate proper sync with the camera.
The format selector is labeled accordingly.
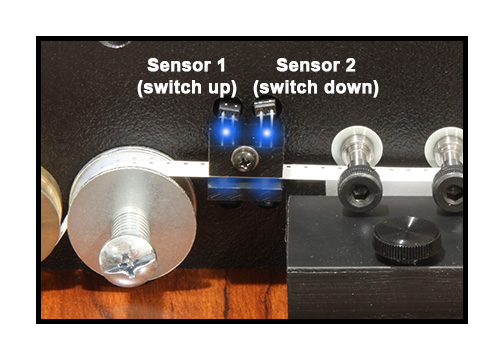
Each gate has two sensors and, therefore, two switch positions.
Up is for S8, 9.5mm and 16mm. Down is for R8, 9.5mm and 16mm.
You will find that, on some 16mm and 9.5mm films,
one position might work better than another.
The purpose of the sensor knob is to control the amount of blue light that shines through each sprocket hole. As the blue light passes the sprocket hole, it strikes the sensor on the bottom and that triggers the camera to grab each frame as it passes. Because the density of film varies, the sensor knob must be adjusted for each batch of film for optimum performance. This usually is not necessary for every roll as most rolls within a customer batch will exhibit the same density characteristics. But changing from one customer batch to another or changing from one format to another will usually require resetting the sensor knob.
Film with black edges around the sprocket holes can work at almost any sensor setting as long as you do not turn it too low. Film with image contamination between the sprocket holes or clear edges around the sprocket holes will require fine tuning the sensor knob for best transport of the film.
The sensor control is a multi-turn knob. It takes 10 full turns to go from one extreme to the other on the sensor knob. Ideally, turn the knob to the far right until it stops, Then back if off about half a turn to the 11:00 position. That is a good starting point for most film that has a dark edge around the sprocket holes. Film with light areas or image contamination between the sprocket holes my require turning the sensor knob down a bit.
NOTE: The gates are designed primarily for home movies, which dependably have a dark edge around the sprocket holes. The gates will run some clear edge film but the sensor knob will need to be critically adjusted for optimum performance. There may be some clear edge film that will not run smoothly on these gates. We are currently working on some specialty gates for clear edge and other problematic films such as extreme cupping, warpage or long strings of missing sprocket holes. But the provided gate should work for most projectable film.
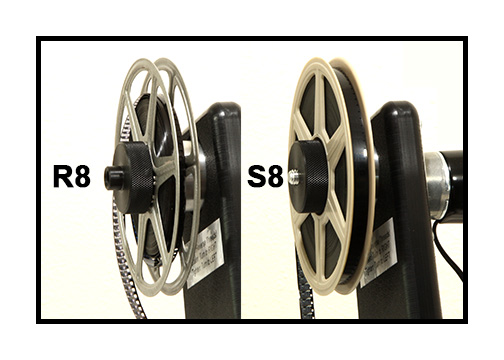
The film to be transferred goes on the left as shown.
For regular 8, the S8 adapter is out. For super 8, the S8 adapter is in.
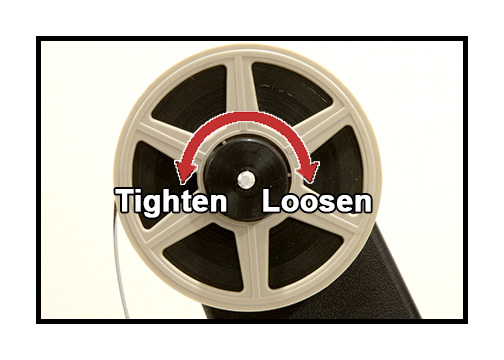
The source spindle has reverse (left handed) threads. This means that you turn to the left to tighten and turn to the right to loosen. Be sure to make sure the reel is firmly tightened to the spindle.
NOTE: The film on the source reel should be wound tightly for proper tension in the film path. Ideally, this should be done during the cleaning of the film during rewind. If the film is clean of debris but is loose, you can also tighten the film by holding onto the end of the leader and putting the unit in "rewind" mode for just a second. This will take up any loose slack in the reel. While convenient, this is not ideal since any debris on the film can cause cinch marks due to slippage. For best results, all film should be cleaned, lubricated and firmly wound on the source reel. Also, the reel should not bind the film edges so warped or damaged reels should be avoided.
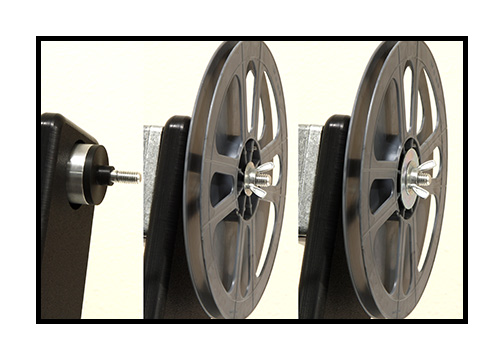
The take up reel goes on the right spindle as shown. If transferring 16mm or 9.5mm, you may need to use the provided spacers for proper alignment. For 8mm film, you will need to insert the black hub adapter as shown. Once the take up reel is in place, use the provided wing nut to lock the reel to the hub. You can use a provided washer, if needed, for a better lock. The take up spindle has normal (right handed) threads. This means that you turn to the right to tighten and turn to the left to loosen. The provided take up reel can be replaced with another reel of your choice as long as the take up reel is not warped and winds evenly.
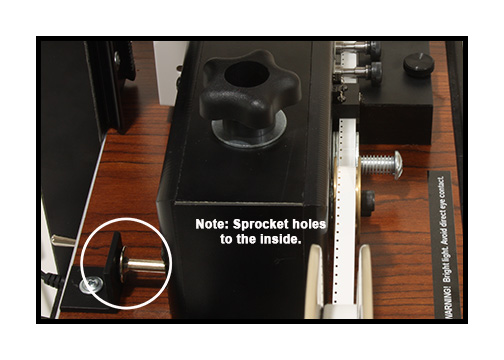
Note that the film comes off the bottom of the reel with the sprocket holes to the inside edge.
When installing a gate, make sure that the rear post is in full contact with the black brackets
or the film path may be skewed and out of alignment with the reel and gate.
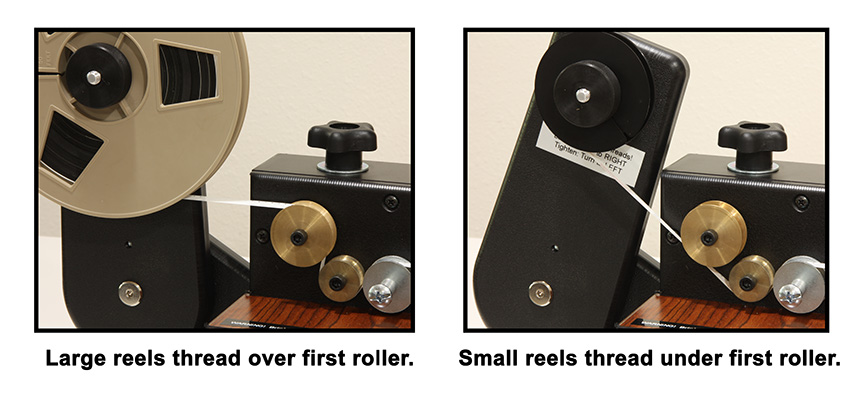
As mentioned above, film should be aligned straight with the gate rollers. If not, then make adjustments using the provided spacers and/or by loosening the knobs to reposition the arms for proper alignment. If you are switching between 8mm and 16mm film often on the same unit, you should be able to find an arm position where all you need to do is add the spacers when switching from 16mm to 8mm.
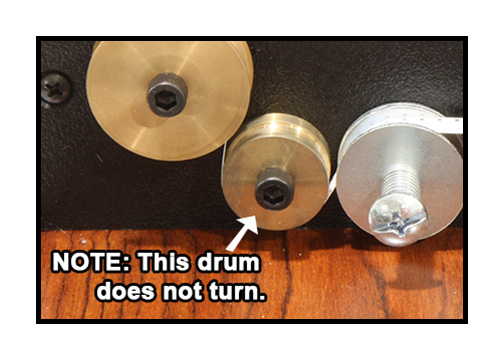
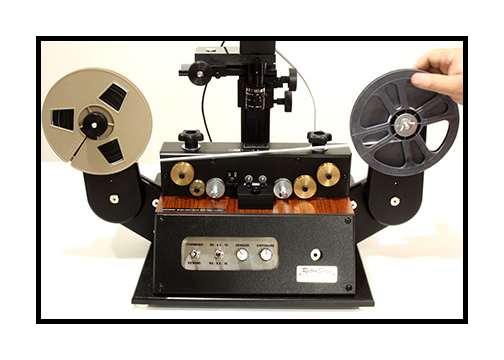
This is what the unit should look like threaded properly. Please note that the lower drum is fixed and does not turn. Do not attempt to loosen or you will void your warranty and affect performance of the unit. All drums and roller surfaces should be kept clean and free of debris.
As part of weekly maintenance, it is recommended to clean all brass parts with an anti-static cleaner, give a single coat of silicone lubricant and then wipe off any excess. The anti-static cleaner will prevent static build up in the film and the silicone lubricant will allow the film to travel smoothly across all non-moving parts in the film path.
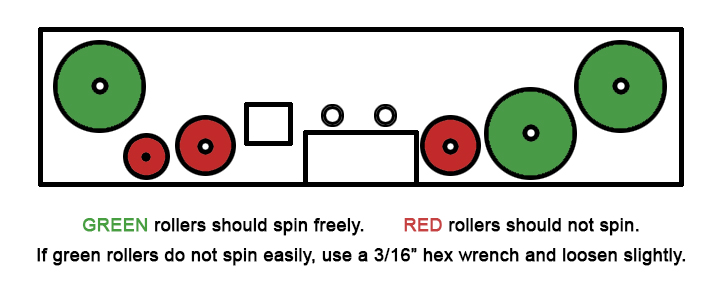
Do not remove any of the rollers and, most importantly, do not add any kind of grease to the shafts that the rollers turn on. The green rollers are oil impregnated bearing bronze and are lubricated for life. If you add grease, it will clog the pores of the metal and cause damage. IF you feel that you need to lubricate the green rollers, just put a drop of mineral oil, 3-in-1 Oil or light weight machine oil where the shaft meets the roller. Do not use WD-40 or any kind of solvent. Generally speaking, no lubrication is necessary for the life of the gate.
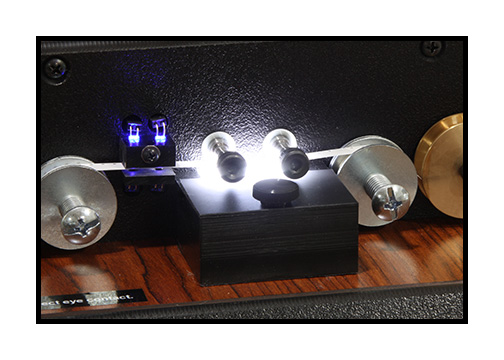
NOTE: The light in this unit is VERY bright. Avoid direct eye contact.
Do NOT turn on the unit with the gate removed to avoid injury.
This concludes the basic set up for using the RetroScan Universal.To rewind, remove the film from the gate. Loosen the wingnut a few turns. Run in rewind while holding your hand lightly on the take up reel to steady the feed and prevent chatter.
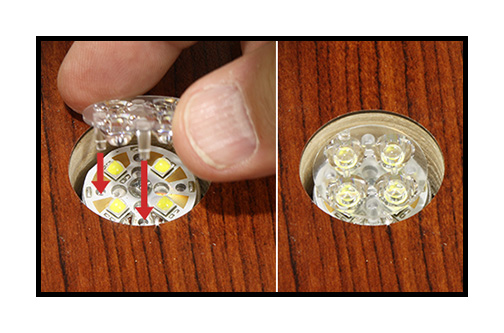
Even though the light is very bright, you may encounter very dense film such as severely underexposed reversal or the occasional Polavision film. To increase the intensity of the light source, remove the gate and install the Bright Lens for the LED. Make sure the pegs of the lens drop into the holes of the LED for proper lens alignment. This lens will concentrate the light of all four LEDs to a central point. The lens should only be used in special circumstances as it can result in a slight hotspot if the camera is not centered over the illuminated area precisely. As noted above, do NOT turn on the unit with the gate removed as this lens will make the light seem even brighter than before!
NOTE: The Bright Lens is not used with the 2K units.
How good should your transfers look? See the sample page HERE.
For SLIDE GATE INSTRUCTIONS click HERE.
If you have any questions, please feel free to call us at 830-966-4664
or email Roger Evans at retrofix@swtexas.net