RetroScan Universal Trouble Shooting
Please bookmark this page for future reference.
This list will be added to as we have more input from users.
Last update: April 5, 2016
I can not load the software.
Make sure that you have a 64 bit system (Win-7 or Win-8 or above) and a minimum of 8 gigs of RAM. For international customers, make sure that your regional/numerical settings are USA/English. Some European customers my need to use an English keyboard.
I click "Start" on the software but the unit does not run.
The software does not control the scanner. You must start the unit running by switching to "Forward" and then click "Start" on the software. When you are finished, click "Stop" on the software and then stop the unit.
When I try to use Set Up or Start, I get an error message that there is no camera connected or too many cameras connected.
Obviously, make sure that your USB cable is plugged in. Also, during installation, there is a point where the software will ask you to plug in the USB cable. If you skipped that step, or if you had the USB cable plugged in during the entire installation, then it is possible that the camera drivers did not load properly. If so, unplug the USB cable, uninstall the software and then reinstall. Once the software completes loading, wait a few minutes before you attempt to use the software so that all drivers and background processes can finish their tasks.
Also, we provide a free USB cable but it is admittedly a rather cheap, mass produced cable. You might need to replace it with a better grade cable. Do not use a cable more than about 6 feet.
Unfortunately, USB connectivity is not an exact science. Some USB ports are silver plated and some are cheaper nickle plated. You may need to try several USB ports until you find one that is reliable. It should be noted that the camera in the Universal actually gets its power from the PC via the USB cable. So it is vital that power settings on the PC be set to max performance and not balanced or energy saver.
In very rare cases, a few people have found the need to use a powered USB hub.
Make sure that nothing else is plugged into other USB ports during capture other than perhaps a mouse and keyboard.
I can capture okay but sometimes the frames are made up of two unrelated frames from different parts of the film.
This is called "image tearing" and it is the direct result of bad connectivity between the camera and the PC. See the section above for solving most USB connection problems.
NOTE ABOUT WINDOWS 10: The Universal software is compatible with Windows 10. However, some customers that have upgraded from Windows 7 or 8 experience image tearing on Windows 10 while tearing did not happen on Windows 7 or 8. If this is the case for you, it is because your motherboard is most likely a couple of years old and isn't totally compatible with Windows 10. Typically, updating the drivers for the motherboard and/or USB ports will solve this problem. New computers that came with Windows 10 do not seem to have an issue (so far). In a worse case, you may have to revert back to Windows 7/8 or add a more up to date USB port in an open PCIe slot.
When I put the software in Set Up, I do not see an image in the capture screen.
When I am capturing, I see the numbers advancing but I see no picture in the capture window.
Make sure that you have latest version of QuickTime installed on your system prior to installing the RetroScan-HD Universal software. Also, make sure that you do the complete install and not the minimum installation. You do not need to purchase QuickTime Pro but that will work if you already have it on your PC.
Also, it is very important that all drivers for both your motherboard and graphics card are up to date. Even if your PC or laptop is new, it may have been on the shelf for at least 6 months or more and, therefore, requires updating.
When I try to capture, I see no image and the numbers do not advance.
Make sure that the sprocket holes are to the inside edge of the gate.
Make sure that you have chosen the correct format on the unit. It is important that you make your determination by looking at the sprocket holes of the film and not by the type of reel. It is common to find Regular 8 on a Super 8 reel and Super 8 film on a Regular 8 reel. As a reminder, Regular 8 has large holes and Super 8 has small holes.
Make sure that the blue sensor lights are on and that the cable in the back of the gate is plugged in.
Make sure that the sensor knob is set to the correct position. Typically, you should turn the knob all the way to the right and then back half a turn to the 11:00 position as a good starting point. If you have clear edge film or film with image contamination between the sprocket holes typical of regular 8 or 9.5mm film, then you may need to turn the sensor knob down quite far.
When I capture film, the RetroScan-HD Universal software will sometimes fail to capture at the beginning of a roll or will occasionally skip frames during capture. There are also times where the software will end a capture prematurely and ask me to name the file.
Film is often clear at the beginning and end of a roll and often has bright imagery that actually touches the sprocket holes. The blue sensor light must be able to distinguish the sprocket hole from the bright imagery for a successful capture of that frame. If the highlight areas are touching the sprocket hole, and your sensor knob is turned too high, then the highlight areas will merge with the sprocket hole. This will confuse the sensor and prevent that frame from being captured. Reducing the brightness on the sensor knob just a tiny bit will usually do the trick.
When I capture, the image in the capture window lags behind by several seconds. When I hit stop, the image continues for several seconds.
If this happens and you are missing frames on your capture, then your PC is having severe resource issues; bad drive, not enough RAM, bad RAM, bad or too slow CPU, etc.
If this happens but your captures are actually okay, then your graphics card can not keep up the display. In other words, the recording is fine but the display falls behind showing the captured frames. Typically updating the drivers for your graphics card will solve this issue.
When I capture, the image seems to vibrate side to side.
For Universal units shipped prior to November 1st, 2015 we have found that, under certain conditions, the bracket that supports the camera platform may vibrate up and down, which will result in unwanted side to side vibration of the image. The type of surface the scanner is sitting on can make a big difference on whether this occurs or not. Hollow tables or thin cabinet tops can increase the likelihood while solid desks and work surfaces decrease the likelihood. Please click HERE for more information on how to eliminate this problem.
I can export a numbered image sequence but I can not export a .MOV file. The folder that should contain the .MOV file is empty.
There are several possible solutions:
Make sure that you have latest version of QuickTime installed on your system prior to installing the RetroScan-HD Universal software. Also, make sure that you do the complete install and not the minimum installation. You do not need to purchase QuickTime Pro but that will work if you already have it on your PC.
Make sure that you are exporting to a drive formatted as NTFS and not FAT32, which is limited to a 4 gig file size limit. Because numbered image sequences have files that are all smaller than 4 gigs, you can export numbered image sequences to a FAT32 drive with no problem but .MOV files are usually larger unless it is a very, very short capture.
Make sure that you have enough open drive space for the size of the .MOV file you are exporting. You must capture to an internal drive but you can export to an internal or external drive.
And finally, QuickTime has a bug that sometimes prevents it from loading the codecs necessary to export .MOV files via RetroScan-HD software. If you find you can not export a .MOV file, QT may be missing the necessary codec for proper operation. You can supplant the missing codec in QT by also installing the Panasonic P2 View Plus. It's free and only takes a second to install. You can download the P2 View Plus HERE.
When transferring a small roll such as 50 feet of 8mm or 100 feet of 16mm, the film is very tight.
For small rolls, may sure you bypass the first roller as noted in the instructions. Also, it is important that your film not be too dry. Good practice for professional quality transfers is to clean your film with film cleaner that has anti-static and lubrication properties. Edwals' Anti Stat Film Cleaner is a good choice as is Solvon, which can be purchased from Urbanski Film. Cleaning your film with alcohol should be avoided as it super dries out the film and makes it hard to navigate the film path.
It should be noted that some old rolls of Regular 8mm emulsion can have a bit of "tack" to them, which makes the edges stick along the guides. This can also increase tension and is sometimes accompanied by a piercing squeal, even on larger rolls where tension is not usually a problem. In that case, you have several options. You can try bypassing the first roller to reduce tension, you can clean your film with a cleaner that has lubricant in it and, as part of general maintenance of the gates, clean all the rollers regularly with silicon spray, which will leave a thin layer of lubricant to help the film flow smoothly.
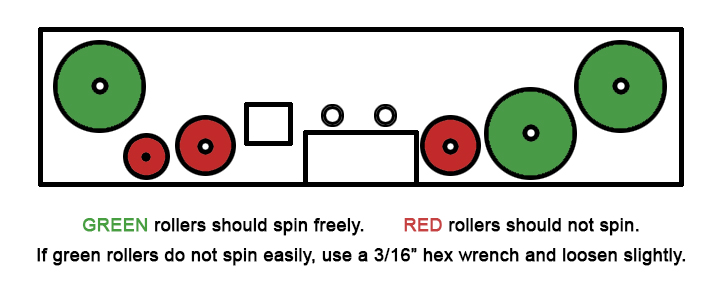
In rare occasions, the larger rollers may not have been loosened enough during testing and calibration or may have accidentally tightened during usage. This can also cause the film to be abnormally tight.
The image is cropped in too much. I want to see more of the frame or the surrounding sprocket hole area.
The degree of cropping is controlled by the length of the lens tube. Shortening the tube will zoom out. Lengthening the tube will zoom in.
The image is noisy, particularly in the dark areas of the film.
Make sure that you are using the latest version of the Universal software version 3.2.1 or above. If using Auto Exposure, make sure that you have your lens and exposure knob set as per the instructions.