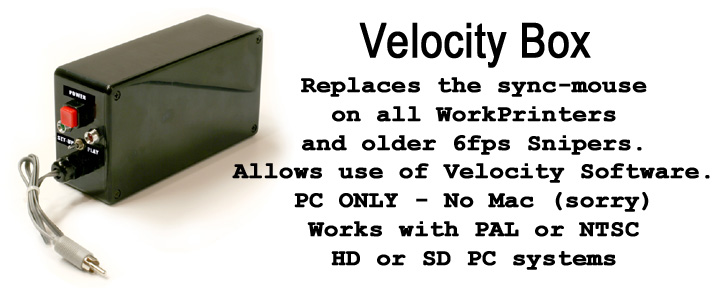
Velocity Box Instructions
Connect the Velocity Box to your SD or HD camera as follows:
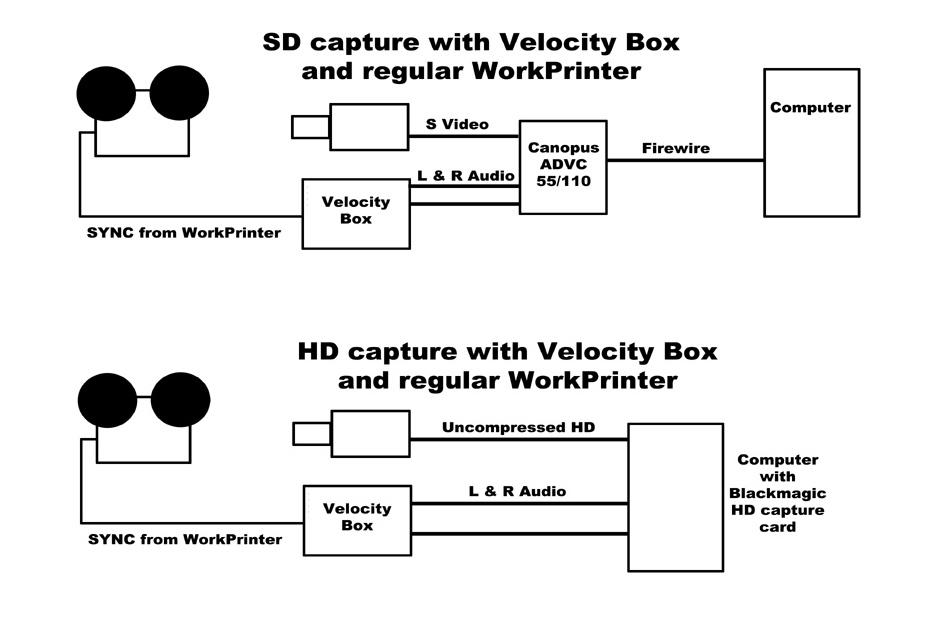
If using Velocity Box with high definition,
click HERE for Velocity-HD instructions.It is highly recommended that you install the Mainconcept DV encoder,
which can be purchased HERE.
This will be used by Velocity-HD when downconverting your HD files.If using Velocity Box with standard definition,
click HERE for Velocity instructions.NOTE: If you received your WorkPrinter unit after the beginning of January, 2009, then the timing disk inside has already been pre-set to the correct position marked by a black line on the large white pulley and a white line on the timing disk. If you have moved the timing disk to use with CineCap or CaptureMate, then you will need to align these two marks before proceeding to use the Velocity Box. If the timing disk has already been aligned by MovieStuff, then you can simply put the switch in the "PLAY" position and proceed by following the Velocity or Velocity-HD instructions.
If you received your unit before January 2009 (or if I goofed and did not set the timing disk) then you will need to set it to the correct position for use with the Velocity Box:
Step 1.
With no film in the projector, remove the large back cover
as well as the small front panel that covers the film path.
Step 2.
Put the Velocity Box switch in the "Set up" position.
Step 3.
As shown in the following diagram, turn the timing disk assembly counter-clockwise and watch the advance claw on the front of the projector.
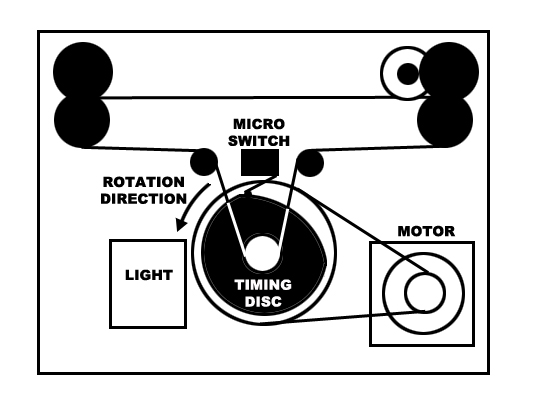
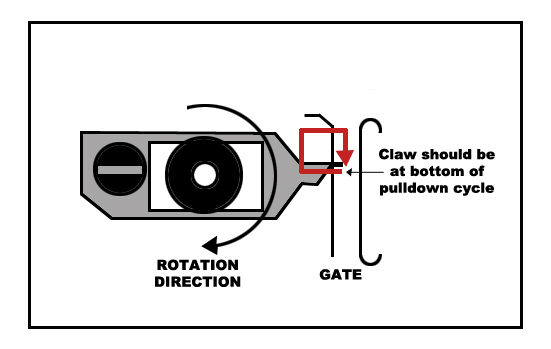
Step 4.Turn the timing disk assembly until the advance claw reaches the bottom of the pulldown cycle as noted in the following diagram.
Step 5.
While holding the claw in that position, adjust the timing disk so that the microswitch arm clicks on the down-stroke and secure the set screw.
Step 6.
To test if the timing disk is set correctly, put the Velocity Box near the advance claw so you can see the both. Reach behind the projector and turn the timing disc assembly in the proper direction. The red light on the Velocity Box should come on the instant the claw reaches the bottom of the pulldown cycle; not before and not after. If the red light comes on too later or too soon, adjust the timing disk until correct.
Once the timing disk is set correctly, put the Velocity Box switch to the "PLAY" position and leave it there. It will never need to be adjusted again.
Step 7.
NOTE: Set your shutter speed to something high, like 1/250th of a second, especially if using PAL cameras or any HD cameras with CMOS sensors (even if you are using the HD camera in the SD mode). On some HD cameras, you may need to go to 1/500th of a second or higher due to the rolling shutter common in CMOS sensors.
Older WorkPrinter units with AC light bulbs my induce flicker when using higher shutter speeds or odd banding if using CMOS sensors. If necessary, we can update your unit to the brighter and steady LED and DC motor. Click here for pricing and order forms.
Follow the Velocity or Velocity-HD software instructions and capture about 30 seconds of Super 8 film (you can later also capture regular 8 but do not use it for the set up). Process according to the instructions. If you see pulldown blur, then use the manual sync settings in the Settings Tab of the software to make small changes in the timing offset. You do not need to recapture! Just experiment with different timing offsets and reprocess until the footage is clear of all pulldown blur.
Contact me if you have any questions!
Roger Evans
830-966-4664