WorkPrinter-XP HD Set Up
For use with a PC or Mac using the SyncMouse
You will need a Mac or PC with three internal drives.
One drive should be your system drive and the other two should be set up
in a Raid-0 drive array. Failure to use an internal Raid-0 array can result
in a loss of sync on the captured file. Drives should be ATA or Ultra-ATA
for your Raid. SATA drives do not work well for rapid stop motion capture
due to mechanical differences in how serial drives cycle compared to parallel
drives.
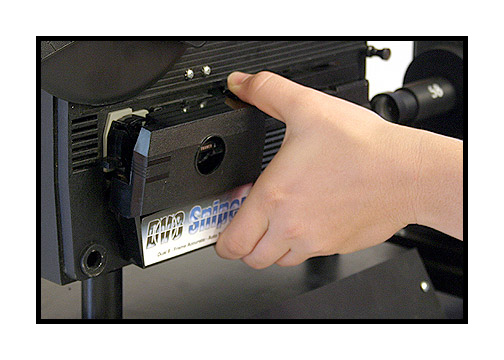
For the Mac, you will need the CaptureMate software.
For the PC, you will need CineCap software.
Both are available only to MovieStuff customers that
have received their WorkPrinter units shipped directly from MovieStuff.
Please email us with the
name and email address that was on the order form used to purchase the
WorkPrinter unit and we will email you the private purchase link for either
the CineCap or CaptureMate software. To maintain your warranty and customer
support, we ask that you please do not publically post this purchase link
on the web. Thanks.
This unit does NOT require a transformer for international
use on 50 cycles.
Just use an adaptor and plug directly into your 220VAC
mains.
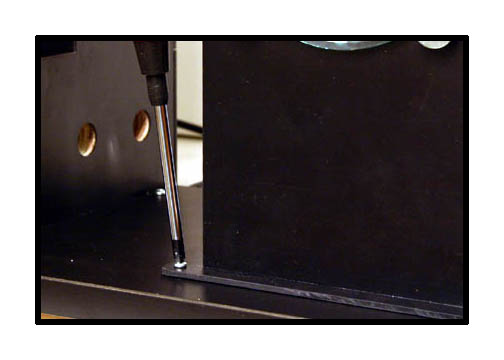
General Set Up
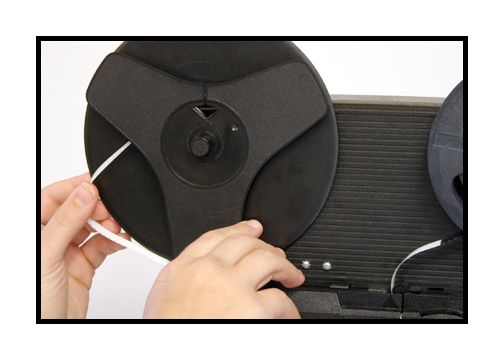
Unpack the unit and attach the lens support board as
shown.
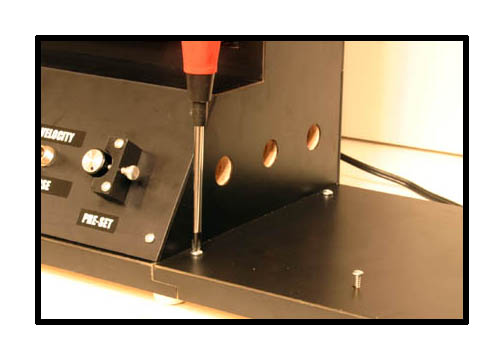
Attach the condenser lens using the provide screws.
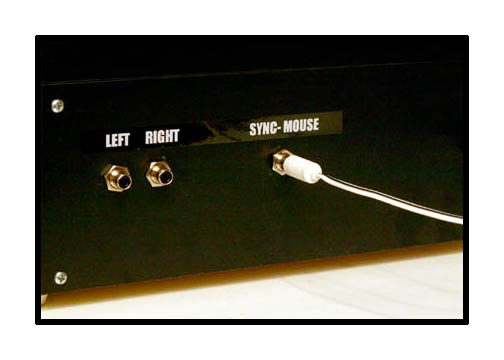
With the computer off, plug the mouse into your computer
and the sync
cable into the RCA jack on the back of the WorkPrinter
control box. Make sure the
selector switch on the WorkPrinter is in the middle
(off) position.
Make sure that the sync mouse is the only mouse plugged
into your computer. Then turn on your computer. Make sure the camera is
mounted on a tripod (column type is best) and is level and centered in
approximate height with the condenser lens. Also, make sure that you can
see the resulting, live image on a large monitor. Using the tiny LCD monitor
on the camera will make critical adjustments tough. Use of a broadcast
underscan monitor is ideal because it will let you see the edges of the
video frame for proper cropping of the image. Consumer TV monitors do not
let you see the entire video frame, which can result in improper cropping
and unlevel images. As a substitute for an underscan monitor, you can use
the capture window of your favorite video editing program, which usually
shows about 99% of the video image.
Make sure your camera is not set to any "auto shutter"
or steady shot positions. At a minimum, 60th of a second speed
should be used for NTSC or 50th of a second for PAL. Higher shutter speeds
will make setting the timing on this unit easier.
NOTE: If using an HD camera in the SD mode, you will
need to set your shutter speed to 1/500th of a second or higher
to overcome the latency inherent in CMOS imaging chips.
Avoid using progressive scan or "frame mode". Just
the normal interlaced video mode is needed. Best results and best registration
is achieved if your film has been freshly cleaned and lubed with good splices
and no torn sprocket holes. Always use the take up reel provided as the
unit has been tension calibrated or use with that reel. Supply reels
should be inspected for warpage or anything that will impede the even feed
of film from the reel. Feed reels that bind or grab the edges of the film
may cause registration problems or even film damage. Head leader should
be fairly straight without a lot of "curl memory" that will impede proper
loading.
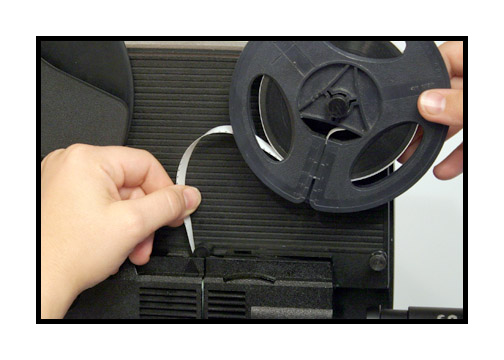
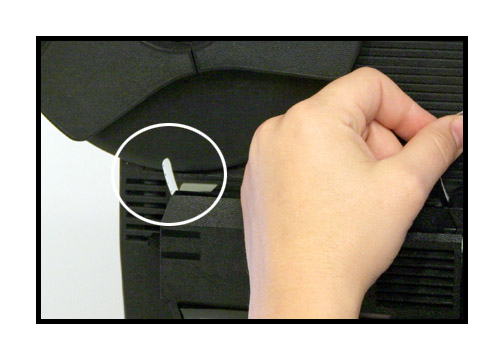
Turn on power to the unit.
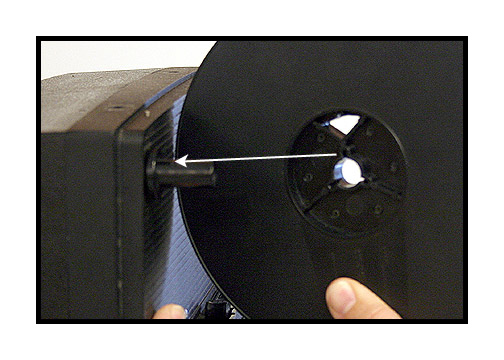
Install reel, making sure that the fin on the spindle
aligns with one of the slots in the reel.

Cut the tip of the film as shown to prevent jamming
during the loading process.
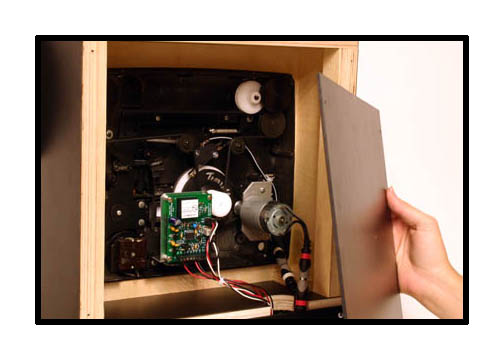
Remove the side panel by squeezing the tabs on the
top and bottom of the cover.
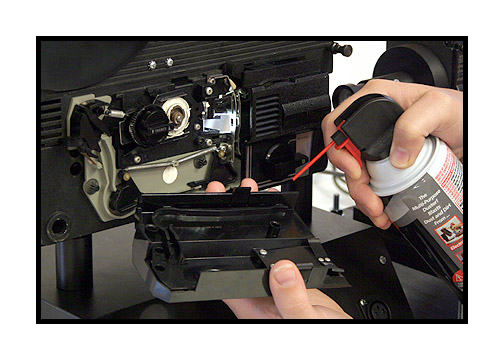
Blow with air and/or dust with brush.
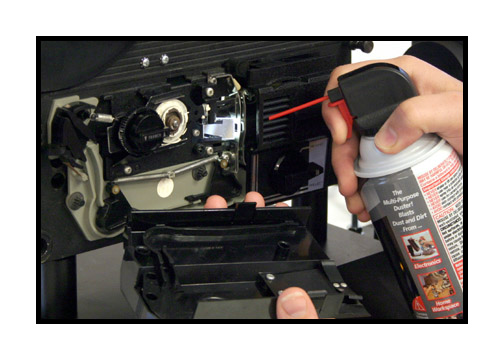
Also clean the gate using air and/or brush.
Replace the side panel.

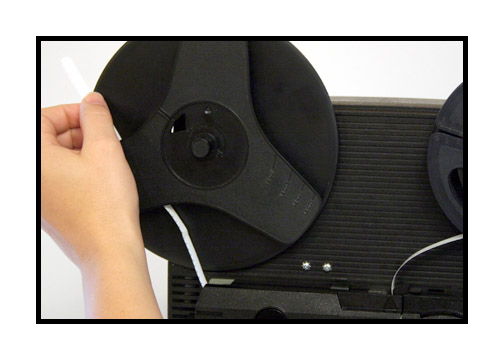
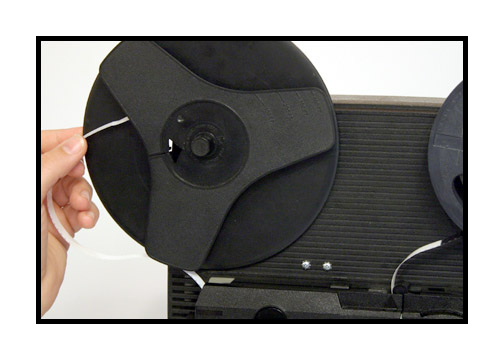
NOTE: There is a super 8 adaptor on the feed spindle.
If using regular 8 reels, remove the spindle adaptor
by grabbing
the black plastic (do not press the silver metal clip)
and firmly but gently pull.
Put the reel of film on the feed spindle
Using your left hand, push the film into the projector.
(I know this is odd but we have found it easier to load with your
left hand, even if you are right handed.)
NOTE: There is no "auto feed" on these units.
Make sure the control knob is in the off position
when loading.
If the film catches in the first inch or so, the advance
claw
may be engaged. Bump the motor switch on and off to
retract the advance claw.
If the film catches at the bottom, turn the control
knob to rewind temporarily.
This will retract the pressure plate more and make
loading easier.
After clearing the first turn, put the control knob
back to stop.
Push the film until it appears at the back of the
projector.
Pull the film to achieve some slack in the leader.
Lay the film onto the reel.
Manually turn the reel to take up slack while keeping
tension on the film.

Close the gate by turning the knob clockwise to project/play.
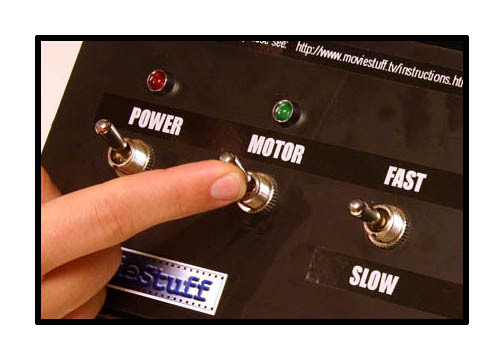
Seat the film by turning the motor on and off briefly.
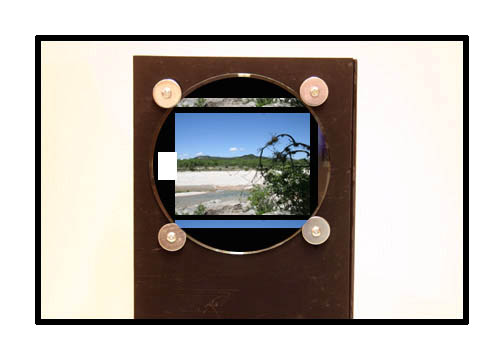
With the focus lever of the projector in the middle, vertical
position, watch the monitor and move the camera away from the condenser
lens until you begin to see a white area in the center of the condenser
lens. Some side to side movement will probably be necessary as well. (It
is helpful to have a lamp shining on the outside of the condenser lens
so you can see the placement of the image relative to the edges of the
lens.) When you first align the camera you will probably see a round white
circle of illumination. As you pull the camera back, that circle will get
larger until it reveals the rectangular edges of the gate. Once you reach
that point, stop and adjust the camera up and down and side to side to
get the illumination even. To do this, use the adjustable column on the
tripod for up and down movement (as opposed to tilting the camera) and
slide the tripod side to side (as opposed to panning).
The camera should be about 36-42 inches (a little more
than a meter)
from the condenser lens. Align the camera up and down,
left and right until you see the image clearly in
the
condenser lens. You may need to move the camera
back or forward a bit for best results.
It is not unusual for the sprocket hole on the left
to spill off the condenser lens.
Zoom your camera into the image.
NOTE:
It should be noted that the focus can be adjusted
in two different ways: your camera and the projector. In fact, because
there is no screen, the lens of the projector, the condenser lens and the
camera lens are all working as one, big lens. Moving elements to different
positions will create different results. If you zoom in and find that you
can fill the frame but can not focus at all or evenly via the camera, set
the camera focus as best you can and then adjust the focus of the projector.
If the projector focus seems to be at its limit, remove the knob from the
side of the projector by pulling on it and that will reveal a small philips
screw. Remove that screw and that will let you remove the plastic bonnet
covering the lens. This covering is not necessary for the projector to
operate and removing it will allow greater freedom on the focus lever though,
nominally, it should really be close to center.
Ultimately, there is little I can tell you here about
how to set your focus as every camera is different. You will have to experiment
with your set up until you get it right. I can tell you that you should
be able to get it sharp edge to edge with no chromatic aberrations and
no distortion or pin cushion. Just remember that you have several ways
to attenuate the image by using the projector focus and camera focus in
combination. Once you feel you have achieved the desired result, zoom your
camera in to rid the image of the edges of the gate and refocus. The image
should be sharp edge to edge and corner to corner with no hot spot nor
any chromatic aberrations. If the edge of the frame goes dark when you
zoom in, just adjust the placement of the camera side to side (not panning,
but actually moving the camera) ever so slightly until you restore even
illumination.
Do a test transfer. With the CineCap or CaptureMate software
launched, click off the first frame of the stop motion sequence manually.
After clicking off the first frame manually, leave the cursor of the mouse
hovering over the capture button. Turn on the motor and then the mouse
selector switch. The unit will start to advance the film. If all things
are working normally, you will observe the on-screen capture button being
depressed automatically for each frame that comes up in the gate of the
projector. If your hard drive is set up correctly and has the proper speed
for video, the numbers in the capture frame will advance evenly along with
the projector. Again, the pulldown "streak" will be visible during capture
but should not show up when you play back the footage as it is "skipped"
by the discrete timing of the micro switch. If using Capturemate for the
Mac, do not capture in the Quicktime mode. Use the DV stream mode and set
the mouse/frame delay to "0". Use the timing disk inside the Workprinter
if timing adjustments are required.
You are almost through but DO NOT SKIP THIS NEXT SECTION!
Turn off the mouse switch, stop the projector and
play back your footage and look for signs of visible pulldown blur.
There should be zero artifacts. The image should be crystal clear and have
no vertical blur. However, if a test reveals any vertical pulldown
blur, the black timing disk can be adjusted with the use of an allen wrench
(not included).
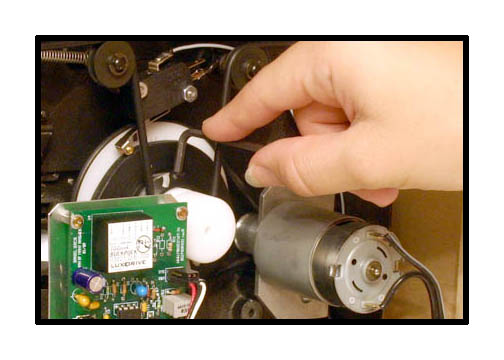
To adjust the timing disk. Remove the back cover (4
screws).
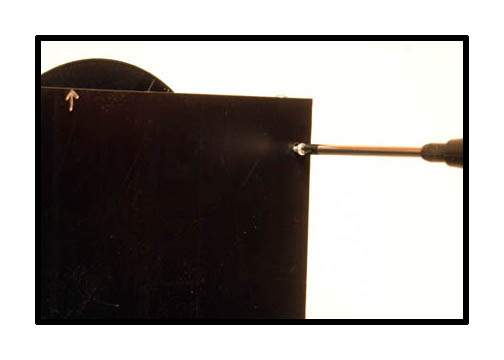
The timing disk is located inside the back and is positioned
between the motor and the LED assembly. Using the wrench, loosen the set
screw on the timing disk and, while holding the pulley behind it, gently
but firmly turn the timing cam a bit one direction or the other.
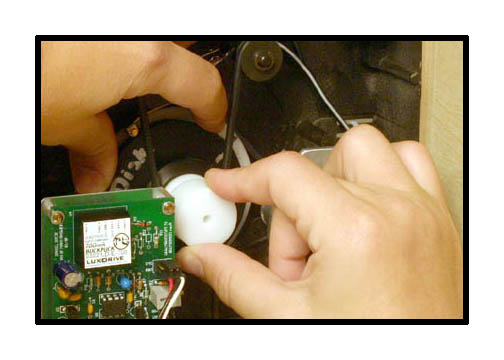
I recommend moving it in about half inch increments until
you see better results, then use smaller increments to fine tune the timing.
Tighten the set screw snugly and do another transfer test. If the pulldown
frames get worse, then rotate the timing cam the opposite direction. If
they get better, then turn the cam the same original direction a bit more
and do another test. NOTE: You will always see vertical blur during transfer.
This is normal. However, no vertical blur or smearing should be present
on playback.
All tests should be viewed on a normal, full size video
monitor and not a computer monitor. Computer monitors can sometimes leave
out fields during playback and will not give you a true indication of what
your footage looks like. Use super 8 film to do your initial alignment
and testing.
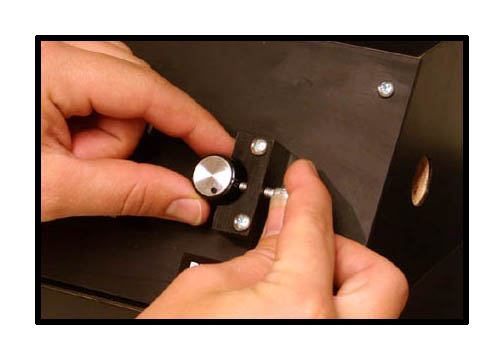
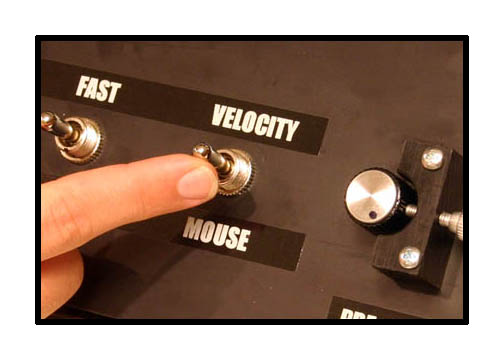
The LED light source can be preset to the desire intensity
by adjusting the preset knob.
Loosen the set screw and turn the knob to the desire
level.
The knob can also be used to adjust the exposure manually
during transfer.
That covers the basic set up for the WorkPrinter-HD .
Let me know how it works out and if you have any problems that need trouble
shooting. If necessary, you can email
me with questions or call me at 830-966-4664 and I will be glad to talk
you through any difficulties.
Hope you have spectacular results!
Roger Evans