You will need a Mac or PC with three internal drives.
One drive should be your system drive and the other two should be
set up in a Raid-0 drive array. Failure to use an
internal Raid-0 array can result in a loss of sync on the captured file.
For the Mac, you will need the CaptureMate software. For the PC, you will need CineCap software.
Both are available only to MovieStuff customers that
have received their WorkPrinter units shipped directly from
MovieStuff. Please email
us with the name and email address that was on the order form used to purchase
the
WorkPrinter unit and we will email you the private
purchase link for either the CineCap or CaptureMate software.
To maintain your warranty and customer support, we
ask that you please do
not publically post this purchase link on the web.
Thanks.
After unpackaging the
unit, place on a sturdy and stable surface.
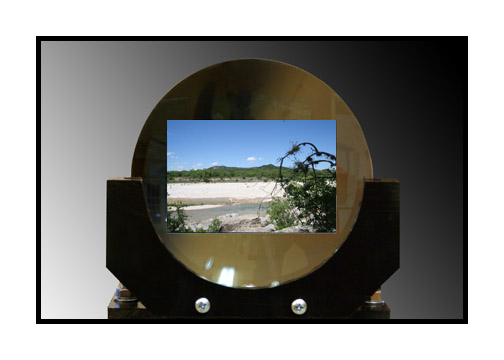
The end with the condenser
lens should allow for a tripod to be placed
about a meter or less
from the unit with clearance enough
for the tripod legs.
The tripod should have an adjustable height via
a column and the head
should allow for seperate horizon and tilt functions.
Ball-head tripods
should be avoided.
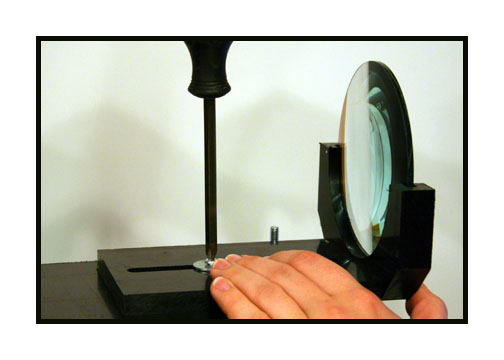
First, place the lens
into the holder.
(glass should be cleaned
with non-alcohol products and a clean, cotton cloth)

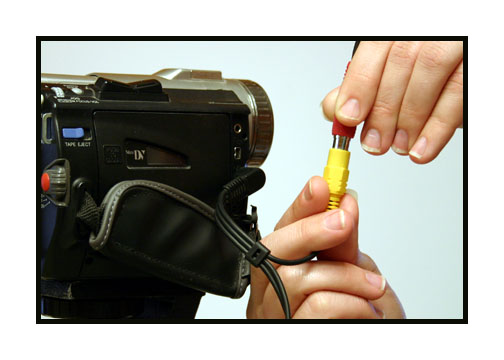
Next, connect the cables
as shown.
The white cable is
from the special sync-mouse provided.
The large multi-pin
cable is found coiled in the back of the projector.
The third cable is
for a reference video signal from your camera.
Due to design changes,
not all RGB units have this feature.
Make sure the "sync" switch on the control box is off.
Connect the mouse to
your Mac or PC before booting up. Please use
only one mouse on
your system at a time.

If your unit has the
reference cable, connect the other end to
your camera video
output as shown. Some later models
do not use the reference
cable connection.
Next, load some film
into the unit as shown.
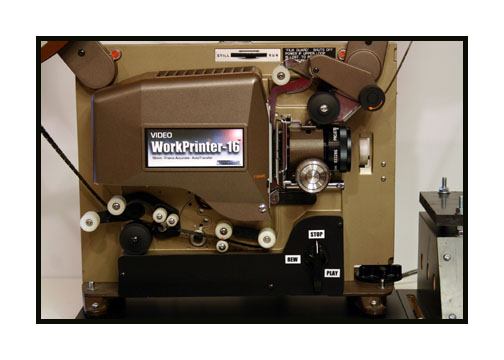
With the motor switch
"off", turn the control knob
to the play position
to close the gate.
Run the motor switch
briefly to seat the film and to proceed to a
bright, well exposed
frame.
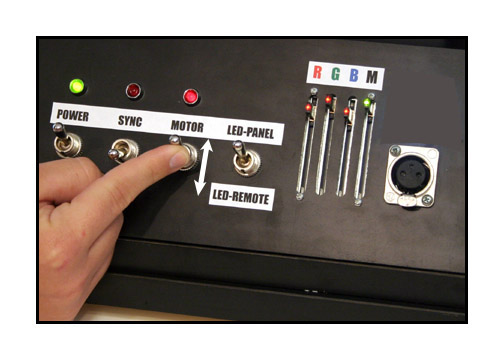
Turn on the lamp switch
on the control box panel.
On units with a video
reference going to the camera, it will be necessary
to turn on the camera
to activate the RGB light source. Make sure the RGB
control switch is
set to "LED Panel". No tape should be in the camera and the camera
should be running
off of its wall AC adapter and not battery power. Camera should
be set to 1/60th of
a second or higher and image stabilization should be off.
Make sure that your
white balance is on manual or the camera's auto-white
balance will constantly
fight the color corrections you make with the RGB controls!
For alignment, it is
easiest to move the camera out of the way and simply
look into the condenser
lens to familiarize yourself with the image.
Your head should be
about 2.5 feet or so from the condenser lens.
You will most likely
need to adjust the distance, height and lateral position
of the lens relative
to the projector.
Because this unit has
no mirror for maximum image quality, the image
will be reversed left
to right. This can be easily corrected via software
either after capture
or on your NLE system.
Lateral adjustments
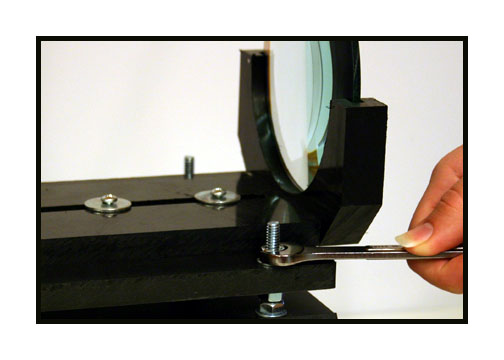
can be made by loosening the two screws holding
the control box in
position and then gently retighten until firm.
Various films have
different frame line placements. To make minor adjustments
in the vertical positioning
of the frame, use the adjustable foot at the front of
the projector as shown.
Position the camera
about 2.5 feet from the lens. Look at the monitor
for distortion of
the image. If there is curvature of the image top and bottom
then you need to adjust
the focus knob of the projector to correct. This will make the image
go out of focus, which
is normal. Always reclaim your focus using the camera lens.
Never use the projector
focus knob to adjust focus. The projector
focus knob should
only be used to correct for distortion.
Color can now be adjusted
by using a combination of the slider controls
on the panel. "M"
is the master level, R is for Red, G is for Green and B is for Blue.
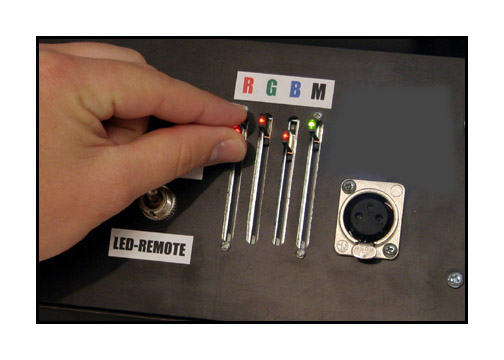
It is advised to keep
the sliders above the 50% mark to
keep the light level
high for best exposure. Each camera will react to the
color controls differently.
There is no "pre-set" position for white light
on the controls and
having all the controls lined up together will not
necessarily create
white light for the camera. Experimentation of the camera
white balance settings
and slider combinations will need to be done
to see what works
best for your set up.
You can switch the
controls to remote for convenience during capture.

To begin capture,
launch your capture software and verify that you have an image
in the capture window.
Type the appropriate file information and then
place the cursor over
the capture button and leave it there.
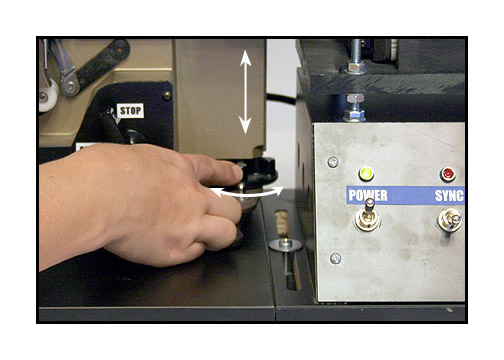
Turn on the motor
switch to start the projector running. Then turn on
the sync switch to
begin capture. The on-screen capture button
should begin "clicking"
on its own.
After capture, review
the footage on regular television monitor to look for pulldown
blur. A computer monitor
should be avoided for critical review during this process
because computers
and macs will notoriously drop a field to accomodate
the display of interlaced
video. If you have pulldown blur that exists on a field
that is beind dropped,
you will not see it. But you will see it on regular interlaced
television monitor.
Pulldown blur is caused
because the film was captured during motion instead of
stationary in the
gate. Every camera/computer combination has a slightly different
timing characteristic
so there is no way for us to "pre-set" the timing.
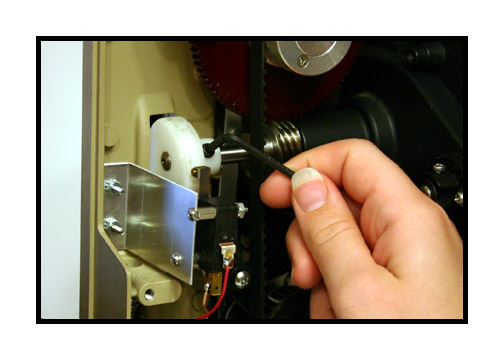
To adjust the timing,
remove the back cover by taking out the various screws
edge of the
cover. Near the front you will see a small timing disk. There is a set
screw
on the timing disk
that needs to be loosened using a small hex head wrench.
Once you loosen the
screw, turn the timing disk on the shaft to a new position.
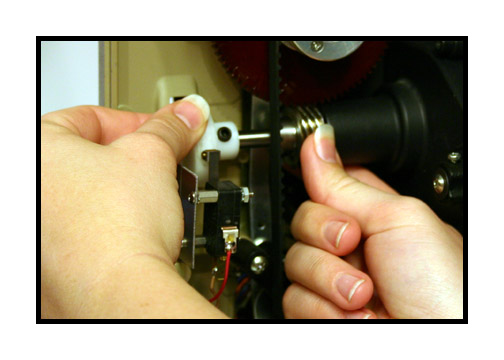
Re-tighten the set
screw to hold the new position. Do not over-tighten
or you will crack
the plastic timing disk.
Repeat a capture and then review the file to look for pulldown blur, etc.
If your timing is set
correctly, you will have no noticable pulldown blur.
If your timing is
set incorrectly, you will have blur that comes and goes randomly.
It is not unusual
to have to turn the timing disk almost 360 degrees from the
initial position.
Again, there is no "pre-set" position. Every set up is different.
As noted on the website,
your Mac or PC should have three drives. One drive should
be your system drive
and the other two should form a Raid-0 drive array. All should
be internal and no
external capture drives should be used. SATA drives should be
avoided for your Raid
for best results, if possible. Make sure that all other programs
are shut down during
the capture process. No screen savers, no minimized programs,
no active network
cards, etc.
Once you have your
timing set, you can then capture and process the files through
your software for
speed changes, etc. There are functions within the software
to provide horizontal
flipping of the image while processing the speed changes or
you can do it on your
NLE afterwards.
Feel free to contact me if you have any questions! 830-966-4664
Roger